Section 1.4: The Boot.ini File
The Boot.ini file is a hidden file that the Windows XP Professional Setup program saves in the active partition when you install Windows XP Professional. Ntldr uses information in the Boot.ini file to display the Please Select The Operating System To Start menu, from which you select the operating system that should be loaded.
1.4.1: Components of the Boot.ini File
The Boot.ini file includes two sections, [Boot Loader] and [Operating Systems]. The [Boot Loader] section of a Boot.ini file contains the specified time that the Please Select The Operating System To Start menu is displayed and the default operating system that should be loaded if no selection is made within the specified time. The [Operating Systems] section of the Boot.ini file contains a list of all the operating systems that are installed on the computer.
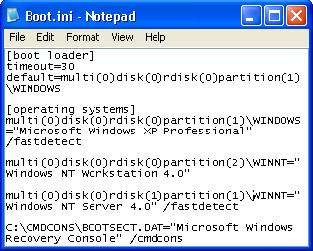
Figure 1.2: A Boot.ini File.
1.4.2: ARC Paths
During installation, Windows XP Professional generates the Boot.ini file, which contains Advanced RISC Computing (ARC) paths pointing to the computer's boot partition.
Table 1.10: ARC Path Naming Conventions
| Convention | Description |
|---|---|
| multi(x) | scsi(x) | The hardware adapter or disk controller. Use scsi only to indicate a SCSI controller on which SCSI BIOS is not enabled. All other hardware adapter or disk controllers use multi. (x) represents a number that indicates the load order of the hardware adapter. The hardware adapter first to load and initialize receives number 0. |
| Disk(y) | The SCSI ID. For multi, this value (y) is always (0) |
| Rdisk(z) | A number (z) that identifies the disk and starts with (0). |
| Partition(a) | A number (a) that identifies the partition. Partition numbers start with (1) |
Note: The lowest possible ARC path, i.e. the ARC path that points to your primary boot partition an your primary master drive (C:) is multi(0)disk(0)rdisk(0)partition(1)
1.4.3: Boot.ini Switches
You can add a variety of switches to the entries in the [Operating Systems] section of the Boot.ini file to provide additional functionality. Table 1.11 lists some of these switches.
Table 1.11: Boot.ini Switches
| Switch | Description |
|---|---|
| /basevideo | Boots the computer using the standard VGA video driver. |
| /bootlog | Enables boot logging to Ntbtlog.txt in the systemroot folder. |
| /debug | Loads the Windows kernel debugger. |
| /fastdetect=[comx | comx,y,z.] | Disables serial mouse detection. Without a port specification, this switch disables peripheral detection on all COM ports. By default, this switch is included in every entry in the Boot.ini file. |
| /maxmem:n | Specifies the amount of RAM that the operating system should use. |
| /noguiboot | Boots the computer without displaying the graphical boot status screen. |
| /safeboot | Forces the computer to start in safe mode. You can specify safeboot parameters when using this switch. |
| /sos | Displays the device driver names as they are loading. |
1.4.4: Advanced Boot Options
The Windows XP Professional advanced boot options include Safe Mode, Enable Boot Logging, Enable VGA Mode, Last Known Good Configuration and Automated System Recovery.
- Safe Mode can be used if your computer does not start properly. Pressing F8 during the operating system selection phase displays a screen with advanced options for booting Windows XP Professional. If you select Safe Mode, Windows XP Professional loads only basic files and drivers that are required to support the operating system. If your computer does not start using safe mode, you can try Windows XP Professional Automated System Recovery (ASR). You can also choose Safe Mode With Networking, which is the same as Safe Mode except that it adds the drivers and services required to enable network access, and Safe Mode With Command Prompt, which is the same as Safe Mode except when the computer restarts, it displays a command prompt.
- Enable Boot Logging logs the loading and initialization of drivers and services in the ntbtlog.txt file, which is located in the windir folder and can be used for troubleshooting boot problems.
- Enable VGA Mode option starts Windows XP Professional with a basic VGA driver.
- Last Known Good Configuration starts Windows XP Professional using the registry information that Windows XP Professional saved after the last successful startup of Windows XP Professional. Windows XP Professional startup is not considered successful until a user logs on at the computer. After a logon, the system automatically copies the Clone control set to the LastKnownGood control set making the current control set the Last Known Good Configuration
Note: Last Known Good Configuration cannot be used to recover from a start up failure that caused by a hardware failure, or a missing or corrupt file as these are not loaded from the registry when you boot Windows XP Professional.
1.4.4.1: The Recovery Console
The Recovery Console is a command-line interface that can be used to perform a variety of troubleshooting and recovery tasks, including
- Starting and stopping services;
- Reading and writing data on a local drive; and
- Formatting hard disks.
1.4.4.1.1: Installing and Starting the Recovery Console
You can install the Recovery Console from the Windows XP Professional Installation CD by running the winnt32 command with the /cmdcons switch from the command prompt. After Recovery Console is installed, you can access it from the Please Select Operating System To Start menu. You can also use the Windows XP Professional Installation CD to start your computer and then select the Recovery Console option when you are prompted to choose repair options.
Note: On a 64-bit, Intel Pentium 4 computer you can use ia64winnt32.exe /cmdcoms to install the Recovery Console
1.4.4.1.2: Using the Recovery Console
The Recovery Console provides you with a limited set of DOS-based administrative commands that you can use to repair your Windows XP Professional installation. A list of the Recovery Console commands is shown in Table 1.12.
Table 1.12: Some Recovery Console Commands
| Command | Description |
|---|---|
| Chdir (cd) | Displays the name of the current folder or changes the current folder |
| Chkdsk | Checks a hard drive and displays a status report |
| Copy | Copies a single file from a stiffy drive or CD-Rom drive to the hard drive |
| Delete (del) | Deletes one or more files |
| Dir | Displays a list of files and subfolders in a folder |
| Disable | Disables a system service or a device driver |
| Enable | Starts or enables a system service or a device driver |
| Exit | Exits the Recovery Console and restarts your computer |
| Fdisk | Manages partitions on your hard disks |
| Fixboot | Writes a new partition boot sector onto the system partition |
| Fixmbr | Repairs the master boot record of the partition boot sector |
| Format | Formats a disk |
| Help | Lists all of the Recovery Console commands |
| Listsvc | Lists the device drivers and services that are currently installed on the computer |
| Mkdir (md) | Creates a folder |
| Rmdir (rd) | Deletes a folder |
| Rename (ren) | Renames a single file |
| Systemroot | Sets the current folder to the systemroot folder of the system that you are currently logged on to |
| Type | Displays a text file |
1.4.4.2: Automated System Recovery (ASR)
You can also user the Automated System Recovery (ASR) to recover from boot problems. The ASR process allows you to recover a system that is unable to start because of a hardware malfunction, the loss of a storage device, or another system disaster. After installing Windows XP Professional you can prepare the ASR process by running the Automated System Recovery Preparation Wizard and creating an ASR Disk. You can use the Automated System Recovery Preparation Wizard to back up an entire partition. The ASR disk enables you to gain access to that backed up data. The data can be backed up to a tape drive or writable CD-ROM, or backed up to a file and then burned to a CD or tape. The floppy disk created at the end of the backup process contains the ASR state file, named Asr.sif, and other files needed to restore the system to its original state.