You can install Windows XP Professional directly from the CD-Rom or from a network share. The Windows XP Professional installation process consists of four stages:
Stage 1: Hard Drive Preparation. In text mode Setup checks the hard drive for consistency and errors. It allows you to format and create the Windows XP Professional partition if you need to and copies setup files to the hard drive. Setup then reboots the computer.
Stage 2: Setup Wizard. The graphical user interface Setup Wizard gathers information from you; such as regional settings, your name and organization, the Windows XP Professional CD-key, and computer name. Creates the local Administrator user account and requests a password for it.
Stage 3: Installing Network Components. After the Setup Wizard has gathered the necessary information from you in Stage 2, it begins the network components installation. It detects your network adapter card; allows you to choose which network components, such as the network client, file and printer sharing and protocols, to install; allows you to join a workgroup or domain; and installs the components you have chosen.
Typical Network Settings
When you install Microsoft Windows XP Professional, you can either install the 'Typical Network Settings' or 'Customized Network Settings'. The Typical Network Settings installs:
- Client for Microsoft Networks
- File and Printer Sharing
- TCP/IP
- DHCP
Stage 4: Completing the installation. The Setup Wizard completes the installation by installing the start-menu items and applying and saving the configuration settings you chose in the previous stages. It then deletes the temporary setup files and reboots the computer.
Section 1.1: Installing Windows XP Professional
1.1.1: System Requirements
Before installing Windows XP Professional, you must ensure that the computer meets the minimum system requirements as indicated in Table 1.1.
Table 1.1: Windows XP Professional System Requirements
| Hardware | Minimum Requirement |
|---|---|
| Processor | Intel Pentium 2 233 MHz (300 MHz recommended) |
| Memory | 64 MB Ram (128 MB Ram recommended) |
| Hard disk space | 2 GB with an additional 1.5 GB free space (2 GB free space recommended) |
| Networking | Network adapter card |
| Display | Video display adapter card and VGA monitor |
| I/O devices | Keyboard and mouse or other pointing device |
Note: Windows XP Professional offers support for a maximum of 2 processors and a maximum of 4 GB Ram
1.1.2: Installing Windows XP Professional from the CD-Rom
When installing Windows XP Professional from the CD-Rom you can either boot directly from the CD-Rom or, if your computer system does not support booting from the CD-Rom, you can create boot disks.
1.1.2.1: Booting from the CD-Rom.
In your system BIOS set the CD-Rom drive as the First Bootable Device. This is usually set in the BIOS Feature Setup. While you are in the BIOS Setup you should also check that Boot Sector Virus Protection is disabled. The Boot Sector Virus protection prevents any attempt is made to write to the hard drive's boot sector or partition table. When BIOS detects an attempt to write to the boot sector it stops the computer and display an error message. The Windows XP Professional Setup program must write to the boot sector, therefore the Boot Sector Virus Protection must be disabled.
Once you have configured the BIOS, place the Windows XP Professional Installation disk in the CD-Rom drive and reboot the computer. During the boot process you will be prompted to press any key to boot from CD-Rom. Once you have pressed a key the Installation of Windows XP Professional will begin.
1.1.2.2: Booting from boot disks.
If your computer system does not support booting from the CD-Rom, you will have to create boot disks on a computer that has an operating system installed on it already. Unlike the Windows 2000 Installation CD, the Windows XP Professional Installation CD does not contain a makeboot.exe utility. The Windows XP Professional makeboot utility must be downloaded from the Microsoft website at http://www.microsoft.com/downloads/release.asp?releaseid=33291. This file can be used to create the Windows XP Professional boot disks and requires 6 high density floppy disks. These disks can then be used to boot the computer and will load the necessary drivers required to access the CD-Rom drive.
Note: Boot disks operate in a 16-bit DOS mode environment. You therefore cannot use winnt32.exe to install Windows XP Professional as winnt32.exe is 32-bit application. You must use winnt.exe which is the 16-bit equivalent of winnt32.exe, instead.
1.1.3: Installing Windows XP Professional over the network.
To install Windows XP Professional over the network you must copy the i386 folder from the Windows XP Professional Installation CD to a shared folder on the network. You must prepare the client computer by creating a 1.5 GB FAT32 partition (2 GB recommended) that Windows XP Professional will copy the installation files to.
Note: This partition must be formatted with the FAT32 file system and not the NTFS file system as network boot disks, which operate in a MS-DOS mode environment, cannot access a NTFS formatted partition.
You must also ensure that the computer has a can connect to the network share when it has booted. To be able to boot to the network share the computer must have a PXE compliant network adapter. If the computer cannot be booted over the network you will have to create a network boot disk for the computer. A boot disk can be created by using the rbfg.exe utility. If you must use a boot disk to boot the computer, you will have to run winnt.exe to install Windows XP Professional. Boot disks operate in a 16-bit DOS mode environment. You therefore cannot use winnt32.exe to install Windows XP Professional as winnt32.exe is 32-bit application.
1.1.4: Performing an unattended installation.
Microsoft allows for the automated installation of Windows XP Professional through unattended installations. There are three mechanisms through which an unattended installation can be performed. These are through:
- unattended answer files;
- disk imaging using the System Preparation Tool; and
- remote Installation Services
1.1.4.1: Using an unattended answer file.
The first mechanism you can use to perform an unattended installation of Windows XP Professional is to use an answer file. An answer file is an automated script that supply's the Windows XP Professional Setup program with all the information it would require during the installation.
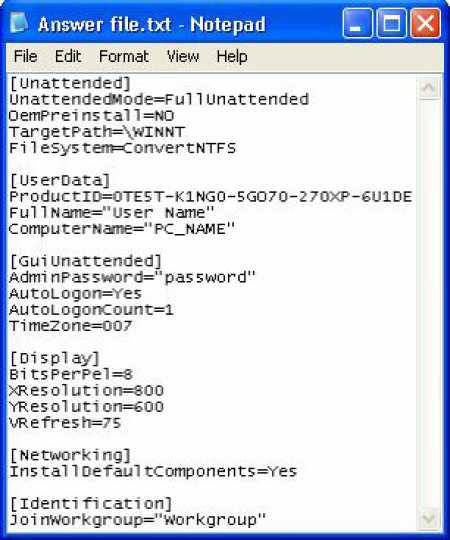
Figure 1.1: A Typical Answer File
You can use Setup Manager to create and modify an answer file. Setup Manager is located in the deploy.cab file in the support/tools folder on the Windows XP Professional Installation CD and can be extracted to your computer by double-clicking on the deploy.cab file. This will display the files contained in the deploy.cab file. Right-click on the files and select Extract on the menu that pops up.
You can use Setup Manager to create an answer file for an unattended installation, a sysprep install, and for a Remote Installation Services. You can also choose the level of automation. This can be:
- Provide Defaults: The answer file provides defaults that the user can see and allows the user to accept or change these settings during the installation.
- Fully Automated: No input is required from the user and the user cannot alter any of the settings.
- Hide Pages: All pages that the answer file provides answers for are hidden from the user.
- Read Only: The user can view any of the answers on the pages that are not hidden but cannot change them.
- GUI Attended: The first stage of the installation is automated but the user must supply the information required by the Setup Wizard during the graphical user interface stage (stages 2 and 3) of the installation.
Note: When creating a Fully Automated answer file, you must include all the information the Setup Wizard requires during the Installation this includes Product key, which must be specified in the ProductID variable in the UserData portion of the answer file. (See Figure 1.1) If the ProductID is missing the installation is stopped during the graphical user interface stage and the following error message is displayed:
Unattended Setup is unable to continue because a Setup parameter specified by your system administrator or computer manufacturer is missing or invalid.
The Answer File can be used in conjunction with a Uniqueness Database File (UDF). The latter provides multiple replacement settings for the settings configured in an Answer File and can be used to automate the installation of Windows XP Professional on multiple client computers.
The syntax for using the Answer file and the UDF file is:
For an explanation of these switches see Table 1.5 and Table 1.6. \r "WinXPInstAns
1.1.4.2: Using the System Preparation tool (disk imaging).
With disk imaging it is possible to install and configure Windows XP Professional and all the applications and application update packs on a test computer and then create an exact image of the hard drive that can then be used to install Windows XP Professional and the applications on other client computers. These computers that will become recipients of the disk image installation are also referred to as target computers.
During an installation that uses disk imaging, the source files on Windows XP Professional Installation CD are not used, except for the initial installation on the test computer. In other words, you would not be using winnt.exe or winnt32.exe to install the disk image on the target computers and thus will not run the Windows XP Professional Setup program. Therefore, you will not be detecting the hardware devices and installing the appropriate drivers on the target computers. As a result, all the target computers must have the same hardware configuration as the test computer. You will also have to change the computer name of all the target computers as each computer on the network must have a unique name.
Microsoft has created a System Preparation tool (Sysprep.exe) which solves some of the problems associated with disk imaging. You would use the Sysprep, after installing and configuring Windows XP Professional, the applications and application update packages on a test computer, to prepare the computer of disk imaging. You would then run the disk imaging program after Sysprep has completed. Sysprep adds a mini-Setup Wizard to the disk image that will request the user-specific information such as productID, user name, network configuration, etc, on the first reboot of the target computer. This information can either be supplied by the user or by an answer file.
When using answer file with the sysprep tool, a Sysprep folder must be created on the %systemdrive% of the test computer or a Sysprep.inf file must be created and saved to a floppy disk that must be inserted at the beginning of the mini-Setup Wizard. The Sysprep folder that is created on the target computer when the disk image is copied is automatically deleted when the mini-Setup Wizard is completed.
Sysprep can also be used to force the target computer to perform Plug and Play detection and to install the correct device drivers on the first reboot of the target computer; however, the target computer and the test computer must have identical hard disk controllers and compatible Hardware Abstraction Layers. The -pnp switch is used to force the target computer to detect its hardware configuration on its first reboot. A full list of Sysprep switches are listed in Table 1.2.
Table 1.2: System Preparation Tool Switches
| Switch | Description |
|---|---|
| /reboot | Restarts the test computer rather than allowing it to shut down after sysprep.exe is completed. |
| /quiet | Mini-Setup runs without user input. Requires an answer file. |
| /pnp | Forces Plug and Play detection on the target computer. |
| /nosidgen | Does not regenerate the SIDs on the target computers. \r "WinXPInstSysPrep |
1.1.4.3: Using Remote Installation Services (RIS)
Remote Installation is the process of connecting to Remote Installation Services (RIS) server from a target computer and then performing an automated installation of Windows XP Professional on the target computer. This is the most effective method of deploying Windows XP Professional. Remote Installation allows administrators to install Windows XP Professional on client (target) computers throughout a network from a central location. It however requires that your network has a Windows 2000 server infrastructure in place and that the client computers support remote booting. A list of network services that the RIS server requires is listed in Table 1.3.
Table 1.3: Network Services Required by RIS
| Network Service | Reasons for RIS Requirement |
|---|---|
| DNS Service | Required for locating the Active Directory directory service and client computer accounts |
| DHCP Service | Required for supplying IP addresses to client computers |
| Active Directory | Required for locating existing client computers and the existing RIS servers |
1.1.4.3.1: Setting up the RIS server
To set up a RIS server, you must install RIS on a NTFS version 5 partition that is at least 2GB size and that does not contain the operating system, i.e. the boot partition, and is not the system partition, i.e. the startup partition, by running the RIS Setup Wizard. And you must specify a Remote Installation Folder that cannot be on a Distributed File System (Dfs) shared folder or on an Encrypting File System (EFS) volume.
The RIS creates and uses CD-based images and disk images. The process of creating the disk image is similar to the process required when using the sysprep tool; first install and configure Windows XP Professional on a test computer, install and configure your applications, apply application update packs and then use the Riprep utility to create a Riprep image. Unlike the Sysprep tool, however, RIS creates its own disk images and does not require third party software. The Riprep utility automatically removes the test computer's SID from the image and creates an answer file based on the configuration of the operating system on the test computer.
1.1.4.3.2: Client requirements for Remote Installation
To deploy the image on the client computers, the client computers must be able to connect to the RIS server by booting from the network adapter card. To do this the client computer requires a PXE-compliant network adapter, which has a special chip that supports network booting. If the computer does not have a PXE-compliant network adapter card, you must use the rbfg.exe file to make network a boot disk for the computer. The network boot disk can then be used to simulate the PXE boot process.
In addition, the user account that will be used to perform the installation must be assigned the right to 'Logon as a batch job' and must be assigned permissions to create computer accounts in the domain that they will be joining.
1.1.5: Deploying Software applications
In Windows 2000 and Windows XP Professional you can use a Group Policy Object (GPO) in conjunction with Windows Installer to automate and manage software installations, updates and removal from a centralized location. Group Policy can be used to assign the software application to a group of users that are organized into a unit (an Organizational Unit) and allow you to manage the various phases of software deployment.
GROUP POLICY
Group Policy and Organizational Units are related to the Administration and management of a Windows 2000 network. They are covered in detail in the TestKing Study Guide 70-217: Implementing and Administering a Microsoft Windows 2000 Directory Services Infrastructure exam and in the TestKing Study Guide 70-218: Managing a Microsoft Windows 2000 Network Environment. For the 70-270 exam you are not required to understand the intricacies of these tools. Therefore it will not be discussed in detail here.
There are four phases of software deployment:
- Preparation: preparing the files that allows you to use Group Policy to deploy the application software. This involves copying the Windows Installer package files to a software distribution point. The Windows Installer application files can be obtained from the application's vendor or can be created through the use of third-party utilities.
- Deployment: the administrator creates a Group Policy Object (GPO) that installs the software on the target computers and links the GPO to the appropriate Organizational Unit. During this phase the software is installed.
- Maintenance: the software is upgraded with a new version or redeployed with a patch or a service pack.
- Removal: to remove software that is no longer required, you must remove the Windows installer package from the GPO that was used to deploy the software. The software is then automatically removed when a user log on or when the computer restarts.
Windows Installer consists of Windows Installer service, which is a client-side service, and Windows Installer package. Windows Installer package uses the .msi file extension and contains all the information that Windows Installer services requires to install the software. The software developer provides the Windows Installer package with the application. If a Windows Installer package does not come with an application, you can create a Windows Installer package or repackage the application, using a third-party utility. Alternatively you could create an application file (.zap) that uses the application's existing setup program. A .zap file is not a native Windows Installer package.
Advantages of using Native Windows Installer packages:
- Automatic File Repair when a critical application file becomes corrupt. The application automatically returns to the installation source to retrieve a new copy of the file.
- Clean Removal without leaving orphaned files and without deleting shared files used by another application.
- Patches. Patches and upgrades can be applied to the installed applications. These patches use the .msp file extension.
Note: A .zap file is not a native Windows Installer package and does not offer the same benefits as Windows Installer packages. It therefore does not support automatic repairing and cannot be transformed.
1.1.6: Upgrading to Windows XP Professional
You can upgrade Windows 98, Windows Millennium Edition, Windows NT Workstation 4.0 Service Pack 6, and Windows 2000 Professional directly to Windows XP Professional. However, Windows 3.1 and Windows 95 must first be upgraded to at least Windows 98 and can then be upgraded to Windows XP Professional. Windows for Workgroups 3.1, Windows NT Workstation 3.5, Windows NT Workstation 3.5.1 and Windows NT Workstation 4.0 must first be upgrade to at least Windows NT Workstation 4.0 Service Pack 6 and can then be upgraded to Windows XP Professional. Windows NT Server 4.0 and the various versions of Windows 2000 Server cannot be upgraded to Windows XP Professional. Windows NT Server 4.0 and the various versions of Windows 2000 Server are server-based Operating Systems while Windows XP Professional is a client-based Operating System.
Upgrading to Windows 2000 Professional and then to Windows XP Professional
Windows for Workgroups 3.1 and Windows NT Workstation 3.5 cannot be upgraded directly to Windows 2000 Professional either. Windows for Workgroups 3.1 and Windows NT Workstation 3.5 must first be upgraded to Windows NT Workstation 3.5.1 or Windows NT Workstation 4.0 and can then be upgraded to Windows 2000 Professional before being upgraded to Windows XP Professional.
Table 1.4: Windows XP Professional Upgrade Paths
| Operating System | Upgrade Path |
|---|---|
| Windows 3.1 | First upgrade to Windows 98 and then to Windows XP Professional |
| Windows for Workgroups 3.1 | First upgrade to Windows NT Workstation 4.0 SP6 and then to Windows XP Professional |
| Windows 95 | First upgrade to Windows 98 and then to Windows XP Professional |
| Windows 98 | Upgrade directly to Windows XP Professional |
| Windows NT Workstation 3.5 | First upgrade to Windows NT Workstation 4.0 SP6 and then to Windows XP Professional |
| Windows NT Workstation 3.5.1 | First upgrade to Windows NT Workstation 4.0 SP6 and then to Windows XP Professional |
| Windows NT Workstation 4.0 | First apply Service Pack 6 and then upgrade to Windows XP Professional |
| Windows 2000 Professional | Upgrade directly to Windows XP Professional |
You can use Windows XP Professional to generate an upgrade compatibility report that can be used to check whether the devices and drivers on the existing operating system are compatible with Windows XP. You can generate this compatibility report by running the winnt32 /checkupgradeonly command or the Chkupgrd.exe utility, which runs the Windows XP Readiness Analyzer but must be downloaded from Microsoft website. The /checkupgradeonly switch of the winnt32 command runs the first part of the Windows XP Professional Setup program and checks only for compatible hardware and software. For a full list of winnt32 see Table 1.5 and for a full list of winnt switches see Table 1.6.
Table 1.5: WINNT32 switches
| Switch | Description |
|---|---|
| /checkupgradeonly | Checks the computer for upgrade compatibility with Windows XP |
| /copydir:folder_name | Creates a folder in the systemroot folder (which contains the Windows XP Professional system files). |
| /copysource:folder_name | Creates a folder in the systemroot folder. Files created with /copysource are automatically deleted after the installation is completed. |
| /cmd: command_line | Specifies a command to be run before the final phase of Setup. |
| /cmdcons | Adds a Recovery Console option to the operating system selection screen. |
| /debug[level] [:file_name] | Creates a debug log at the specified level. |
| /m:folder_name | Specifies that Setup must copy replacement files from another location and to look for files in that location first. |
| /makeiocaisource | Specifies that Setup must copy all installation files to the hard drive. |
| /noreboot | Prevents Setup from rebooting the computer following the file copy phase. This enables a command to be entered by the user prior to completing setup. |
| /s:source_path | Specifies the source location of Windows XP Professional installation files. |
| /syspart:drive_letter | Copies Setup startup files to a hard disk and marks the drive as active. You can then install the drive on another computer. When you start that computer, Setup starts at the next phase. This requires use of the /tempdrive switch. |
| /tempdrive:drive_letter | Specifies a drive to contain temporary setup files and installs Windows XP Professional on that drive. |
| /unattend [number] [:answer_file] | Performs an unattended installation using an answer file that provides your custom specifications to the Setup program. |
| /udf:id[,udf_file] | Indicates an identifier (ID) that Setup uses to specify how a Uniqueness Database File (UDF) modifies an answer file |
Note: winnt32.exe is 32-bit application. It cannot be used in a MS-DOS-based environment such as MS-DOS mode. Boot disks operate in a 16-bit MS-DOS mode environment. You therefore cannot use winnt32.exe to install Windows XP Professional from a boot disk. You must use winnt.exe, which is the 16-bit equivalent of winnt32.exe, instead.
Table 1.6: WINNT Switches
| Switch | Description |
|---|---|
| /a | Enables accessibility options |
| /e[:command] | Specifies a command to be executed at the end of Setup's GUI mode. |
| /r[:folder] | Specifies an optional folder to be installed on the hade drive that is retained after Setup is completed. |
| /rx[:folder] | Specifies an optional folder to be installed on the hade drive. Setup deletes the folder after installation |
| /s[:sourcepath] | Specifies the source location of Windows XP Professional files. |
| /t[:tempdrive] | Specifies a drive to contain temporary setup files. |
| /u[:answer_file] | Performs an unattended installation using an answer file that provides your custom specifications to the Setup program. This requires the /s switch. |
| /udf:id[,UDF_file] | Indicates an identifier (ID) that Setup uses to specify how a Uniqueness Database File (UDF) modifies an answer file |
1.1.7: Deploying Service Packs
Windows XP Professional supports the integration of service-packs called slipstreaming, so service packs can be integrated with the Windows XP Professional installation files. This allows you to keep an image of the operating system. When Windows XP Professional is installed from this image, the appropriate files from the service pack are also installed. To apply a new service pack, run the update.exe file from the service pack with the /slip switch. This will replace the existing Windows XP Professional files with the appropriate files from the service pack.
You can also apply a service pack to computers that are already running Windows XP Professional by running the update.exe file. This replaces the existing Windows XP Professional files with the appropriate files from the service pack.
1.1.8: Installing Windows XP Professional on a Dual Boot Configuration
A dual boot configuration allows you to install two or more operating systems on your computer and to choose between them each time you start your computer. This allows you to run applications that are not compliant with Windows XP Professional on an existing operating system, while using Windows XP Professional for all other applications.
Some operating systems, such as MS-DOS, cannot access partitions that are formatted with the FAT32 or NTFS file systems. However, the active partition is the partition from which the computer starts, and must be formatted with a file system that is accessible by both operating systems.
It is recommended that you install the other operating system and then Windows XP Professional as preWindows NT operating systems must be located on the active partition. Windows XP Professional can however be installed on the active partition or on another primary or extended partition. When you install Windows XP Professional on a partition other than the active partition, Windows XP Professional will copy the necessary files to start the boot process to the active partition, which is referred to as the Windows XP Professional system partition. This enables Windows XP Professional to begin the boot process. The remainder of the operating system files will be copied to the non-active partition, which is referred to as the Windows XP Professional boot partition. During the boot process the Windows XP Professional operating system will be located through the Advanced RISC Computing (ARC) path in the boot.ini file. \r "WinXPIns2 \r "WinXPIns2
1.1.9: Activating Windows XP Professional
After completing an installation of Windows XP Professional, you must activate the Operating System. The first time that a user logs on to a computer running Windows XP Professional, the Activate Windows dialog box appears, and the user is prompted to activate the installed copy of Windows XP Professional. A user can choose not to activate the software, in which case reminders to activate will periodically appear until the user activates the software.
To activate the Operating System:
- Select the Yes, let's activate Windows over the Internet now option, and then click Next; or
- If the computer is not connected to the Internet, the user can click the Telephone button, and then follow the directions for activating Windows XP Professional over the telephone.
Users in large organizations can use a Volume License Product Key that will eliminate the need to individually activate each installation of Windows XP Professional. Additionally, users can automatically activate Windows XP Professional as part of an automated installation.
Note: Users must activate Windows XP Professional within seven days of installation. If not activated within seven days, users are prevented from gaining access to Windows XP Professional until activation occurs.