Section 3.3: Configuring Windows
Before you configure windows on your computer, it is important to prepare your computer for the installation of your windows the preparation includes partitioning and formatting the hard drive, and then installing the pre requisites.
Section 3.3.1: Partitioning the hard drive
The partitioning refers to creating large divisions of hard drive. A partition is a continuous section of sectors that are next to each other. A partition is referred to by a drive letter such as C: or D: Partitions can be made using the FDISK command or through the operating system. The partitioned drive appears as two or more physical hard drives. The partition information is contained in a special file called Master Boot Record (MBR) that resides in the first sector of each hard drive.
Section 3.3.2: Formatting the hard drive
After partitioning the hard drive you must format it so that an operating system can be loaded on it. Formatting is the process of creating and configuring a File Allocation Table (FAT) and creating a root directory. Formatting allows a hard disk to hold files and programs. The formatting briefly scans the hard drive to find any possible bad spots and marks the area as bad sectors. The hard disk or each partition can be formatted with either FAT16, FAT32 file system or NTFS, NTFS 5.0 file system.
FAT32 File System: The FAT32 was introduced with the release of Windows 95. It was quiet similar to FAT16 but was more advanced. It supports larger drives and smaller allocation units. It is however, not compatible with earlier versions of Windows such as Windows 3x and Windows 95.
NTFS File System: NTFS File System is more advanced than FAT32 and includes enhanced attributes for encryption, compressing files, and setting files security. NTFS 4 was used in Windows 4.0. The newer versions of windows used NTFS 5 which includes features such as file inscription, support for large drive sizes and dynamic disks. NTFS 5 is used with Windows2000, XP, Vista, and the latest Windows server versions.
Section 3.3.3: File Structure
Once the disk is formatted, it can store files and folders. Each file that is created in Windows has to follow certain file naming conventions. For example a file name can be up to 255 characters and must have an extension that is used to identify the file type. The file name must not contain special characters such as (/,, .). The file names are not case sensitive and you cannot store duplicate file names in a directory.
The files in Windows can be stored in a folder that is quite similar to a physical file cabinet. The path of file indicates the complete location of a file. Although, files and folders can be created in Windows through Windows Explorer, you can also create them from the command prompt by typing DOS commands such as MD (to make a directory).
You can change the file and folder permissions by changing the attributes of a file or folder and make them read only or hidden. You can also configure indexing, archiving, encryption, and compression settings on files that reside on NTFS volume.
Section 3.3.4: Installing an OS
Operating system can be installed in two generic ways attended or unattended. During an attended installation you need to walk through installation screens and answer the questions prompted such as providing the directory in which OS needs to be installed, network settings, and the product key. In unattended installation you don't need to be present at the time of OS installation. It uses an answer file that contains all the answers of the OS queries. This type of installation therefore requires no human interference.
The unattended installation can be done in many ways. Windows 2000 Professional offers three methods to perform unattended installation:
- Remote Installation Service (RIS): This is a service that runs on Windows 2000/ 2003 Server. RIS is used to create installation images of operating systems with complete computer configurations, desktop setting, and applications. The installation images can then be used to install client computers on the network. This type of installation is also called the network installation of an OS. When you use RIS, a CD-ROM of an operating system is not required for installation. However, the client computers must support remote booting with the Pre-Boot execution Environment (PXE), or they must be started with a remote-startup floppy disk and contain a network adapter that is supported by that disk.
- System Preparation Tool: This type of unattended installation can be done by creating an exact image or the replica of the master computer and then installing that image on other computers. The image can be created by the System Preparation tool or the sysprep utility. When Sysprep is used to perform installation, the conflict for licenses do not arise because the sysprep removes the Security ID of the master computer and generates a new ID for each computer image that is installed.
The attended installation on the other hand can be done through CD, DVD or any other installation media. It is a quick way to perform installation because you don't have to depend upon the network bandwidth.
Sometimes even after inserting a bootable media to the CD/DVD ROM drive, you computer is not able to boot from the installation CD. In such a scenario, it is important that you go into the BIOS settings of the computer to change the boot sequence of the computer. You need to set the DVD/CD ROM to be your first bootable device.
Once the computer boots with the installation CD/DVD, the installation of the OS starts. The setup files are copied to the computer and the computer reboots. A setup wizard then guides you through the process of installation.
The installation screens of most Windows based operating systems are same. However, in server based operating systems, you need to configure network settings also. The OS installation requires you to accept the EULA (End User License Agreement) and provide the License Key of your copy of the OS. After, you provide a valid License Key, you can proceed with the installation.
Windows Vista, however, allows you to proceed with the installation without providing the License key and trying the system for 30 days, as shown in Figure 61. After which, you will not be able to use the system if you have not activated your copy of License with Microsoft. Unlike other Windows operating systems, Windows Vita provides you all versions of Windows Vista in one DVD only, so that you can upgrade to any version anytime you desire by just purchasing the license for that version.
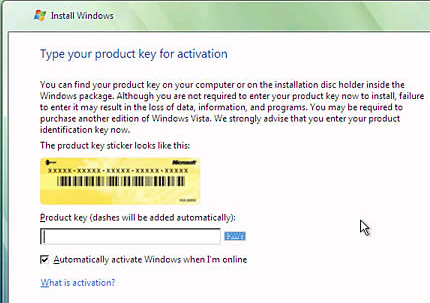
Figure 61
Section 3.3.5: Updating Drivers
Once the OS is installed on your computer, you may need to install the drivers of certain hardware components. Usually you need to install the motherboard drivers, Video card drivers, Network card drivers, sound card drivers, and the drivers of the disk controller. You can find the latest drivers on the manufacturer's website.
The device drivers are not updated automatically. They are optional updates but are important for better performance of the devices. The rolling back of drivers may be required if a wrong version of a driver is installed. However, it is only possible if a previously installed driver has been updated.
The driver rollback feature was introduced in Windows XP. However, it was a nightmare in Windows XP. Windows Vista has made the driver rollback easy. You may also need to uninstall a driver when it not working properly and you are also unable to rollback it.
The drivers can be installed, upgrade, or rollback through Device Manager applet window that appears on clicking Start->Settings->Control Panel-> Administrative Tools->Computer Management->Device Manager.
The drivers that you install on your computer can be signed or unsigned. The driver signing with digital signatures allow the users and the administrators of the drivers know that they are using a legitimate piece of software on their computer. Windows XP, Windows Server 2003, and Windows 2000 warn users when they attempt to install unsigned drivers. However, the users can choose to install unsigned drivers or set operating-system policies to prevent the installation of unsigned drivers.
Section 3.3.6: Upgrading or Migrating an OS
Sometimes, it is important that you upgrade your system instead of performing a clean install because a clean install will remove all the settings, utilities and applications from your computer. The benefit of an upgrade is that you don't have to spend time in and installing necessary utilities and applications again on your computer because an upgrade does not affect the applications, files, and settings on your computer.
The upgrade however, has a drawback that the users have to stick to their old hardware. If your computer has a number of junk data and junk settings then the things will become messier after an upgrade. This problem can be solved by migrating to a newer version of an operating system instead of upgrading to a newer version
The Migration has all the benefits of an upgrade and a clean installation. You don't have to stick to the old hardware for migration. You can perform a clean install on new hardware and then migrate all the configurations and settings of the older computer to the newer computer.
The tool that can be used to perform migration is User State Migration Tool (USMT), which is available on Microsoft's website for download. The USMT supports large scale migrations to be done on multiple computers. It simplifies the migration process and can be used to perform both side-by-side and wipe-an-load migrations. It is also used to perform unattended installations and automated deployments of Windows. USMT can be used to migrate user settings, desktop settings, application settings, and user files from an old version of Windows to a new version of Windows installation. It works with Windows Vista, XP, and Windows 2000.
Section 3.3.7: Keeping the System Current
After performing an installation or an upgrade, it is important to keep your system up-to-date with latest fixes that are released by Microsoft as Service Packs and Option Packs. The latest Service Packs include all the files of the previous service packs. So if you install Service Pack 2 of an OS, you don't need to install Service Pack 1 of that OS. You can also configure your Automatic Updates in your system to keep downloading updates as they are released on the Microsoft's website to keep your system updated.
Section 3.3.8: Virtual Memory
Windows uses two types of memories, RAM and Virtual Memory. The RAM is the physical memory that is installed on the computer in the form of a chip. The virtual memory on the other hand is formed with the combination of RAM and the memory on the hard disk (paging file). The virtual memory allows a computer to run than it has physical RAM for. The virtual memory can increase the performance of the system by allowing the RAM to hold more files than it can support for quicker access. However, the performance can only be increased if the system has memory that is not used by applications. The memory problems on a system can be identified by watching performance counters.
Section 3.3.9: Repair the Install
Sometime while upgrading or migrating your computer due to electricity failure or due to some other problem, you Windows installation will not work. In such a scenario, it is possible in certain OSs such as Windows XP and Windows Vista to repair the install.
To repair the installation of Windows XP, you need to Boot from your Windows XP CD and press Enter when you see the message "To set up Windows XP now, press ENTER". On the Windows XP Licensing Agreement screen, press F8 to agree to the license
agreement. Next, make sure that your current installation of Windows XP is selected in the box, and then press R to repair Windows XP.
Section 3.3.10: Power Management
Power management refers to the Power management settings that enable you to conserve energy or make best use of power when your computer is running. The OSs provides different power management modes that actually simulate system shutdown, when it is not in use. However, they quickly switch from low power usage to normal power usage as soon as you get back to work or when certain wake events from a device, application, or network connection occur.
For multi-vendor interoperability, APM (Advanced Power Management), and ACPI ( Advanced Configuration and Power Interface) standards were defined for power management.
ACPI has defined Power Management states for multiple levels of the system such as, global states and system states. The Global States are defined as follows:
- G0 Working (S0): The fully operational state of a computer. It can run applications.
- G1 Sleeping (S1-S4): This is a sleep state of a computer. It cannot run applications and the system "appears" to be off. However, the computer is not off and work can be resumed without rebooting the OS. The Power consumption is low.
- G2 Soft Off (S5): This is the turned off state of the system with the exception that the main switch still supplies power to the computer. The application and operating system context are not retained in this state and the system must be restarted to resume the work.
- G3 Mechanical Off: This is the complete turned off state of the system and the main power supply is cut off from power supply unit. The power consumption is zero and the OS must be restarted. No hardware context is retained except for the real-time clock.
While shutting down your computer, you can put your Windows XP computer to two important Power states. These states are:
- Standby: In this state your computer is put into the low power state. The currently used data and programs are stored in memory and the power has been cut from hard drive, monitor and other devices. As soon as a key is pressed or the mouse is moved, the computer shifts into the active state. This is because your data is stored in RAM.
- Hibernation: In this state the PC has shut down and is not pulling power. The data are stored on the hard disk. The user has to power on the computer again to return to the active state. The process is not instantaneous as with Stand By but much faster than rebooting because Windows doesn't have to do things such as detecting your hardware.
The following events are supported to wake a computer from a low power state:
- Wake on LAN event: A LAN event and an Ethernet standard that turns on a computer from a sleep state by a network message that is sent by a simple program executed on another computer on the LAN.
- Wake on ring event: Also called Wake-on-Modem (WOM) event that turns on from a sleeping state by sending a special signal over phone lines.
The sleep timers allow you to auto-start up and shutdown your computer at a specified date and time, even if the system was stopped in hibernation.