Section 1.10: Install and configure Printers
There are different types of printers available in the market today. When you purchase a printer, you need to purchase it according to your specific needs. The different kinds of printers that you can purchase are discussed below.
Section 1.10.1: Impact printers
Dot matrix printers are also known as impact printers. They are called impact printers because they print in the same way as typewriters print by striking the inked ribbon against the paper. They are continuous-feed line printer. They have print heads that move in back and forth motions. The main advantage of these printers is to print multi-part forms, which cannot be done by nonimpact printers. They have many disadvantages such as they are noisy, slow, and provide a poor print quality.
Section 1.10.2: Thermal printers
The Inkjet and bubble jet printers are an example of thermal printers. They are called thermal printers because they heat up the ink to about 400 degree Fahrenheit that creates vapor bubbles that force the ink out of the cartridge. An inkjet printer reproduces a digital image by spraying ionized ink at a sheet of paper. They are the most common type of printer and are capable of producing high quality prints as produced by laser printers in a lower price. However, they are considerably slow. They are most popular portable printers because they are capable of producing colored print outs in low cost.
A bubble-jet printer is a type of ink-jet printer. The main distinction is that most ink-jet printers use piezoelectric crystals to create the ink, while bubble-jet printers use heat to do so instead. In a bubble-jet printer, tiny resistors create heat, which vaporizes ink to create a bubble. Each of this bubble of heated ink creates a small drop of ink on printer paper.
Section 1.10.3: Laser Printers or Page Printers
Laser printers are the finest quality printers but are expensive of all types of printers.
They use laser beams to produce an image on a drum. They are sheet fed nonimpact printers. They are also called electrophotographic (EP) printer. The laser printers are also called page printers because an entire page is transmitted to a drum before the toner is applied. The major components of a laser printer are:
- Printer controller: It is a large circuit board that contains RAM and processor and that acts as a motherboard to the printer. It converts the data from the computer to a picture of a page to be printed.
- Toner cartridge: It is a black powder made up of plastic resin and iron oxide. It gets melted due to the presence of plastic in it and forms the text and images due to the presence of iron oxide that is moved due to positive and negative charge. The toner is available in cartridge.
- Drum: It is a photosensitive barrel that is usually made of aluminum. It attracts electrically charged toner as it turns. It is contained in the toner cartridge.
- Primary corona (charge corona): This applies a uniform negative charge of around -6000V to the drum at the beginning of the printing cycle.
- Laser scanning assembly: It throws laser beams on to the drum's surface, manipulating its electrical charge in certain areas so that the toner can be attracted by those areas.
- Paper transport assembly: This contains a motor and some rubberized rollers and is responsible to move paper through the printer.
- Transfer corona or Transfer corona roller: This applies a uniform positive charge of about +600V to the paper. When paper rotates through the drum, the toner jumps off from the drum onto the paper. The paper then passes through the static eliminator that removes the positive charge from it.
- High Voltage Power Supply (HVPS): Provides high voltages that enables the printing the printing process to happen.
- DC Power Supply: It delivers lower voltages to components in the printer that need lower voltages.
- Fusing Assembly: It is made up of two rollers and is responsible for melting plastic resin in the toner so that it sticks to the paper. As the paper rolls in between, it applies heat and pressure so that the toner is well-embedded in the paper.
Section 1.10.4: The Laser Printing Process or EP Process
The laser printer prints in six stages. These stages are:
1. Cleaning: This is the first step and ensures that the EP drum is cleaned, erased, and desensitized of any electronic charge and is ready to use for the printing. It uses a rubber blade to remove any toner particles from the drum and fluorescent lamp to remove any electronic charge present.
2. Conditioning: At this stage the EP drum is conditioned to hold an image by charging the drum evenly with -600VDC through HVPC. This process makes the drum photoconductive.
3. Writing: At this stage, the laser is turned on and scans the drum from side to side. The area of the drum that comes in contact with the laser beam loses some of its negative charge (by approximately -100VDC). As the drum rotates, a pattern of exposed areas is formed, representing the images to be printed. Then the controller sends a signal to the pickup rollers to pull a sheet of paper into the printer, where it stops at the registration rollers.
4. Developing: At this point, the EP drum holds the electrical representation of the image to be printed and is ready to accept toner. The magnetized roller attracts the toner particles located near it and dispenses the toner to the positively charged areas on the rotating EP drum. The EP drum now has a picture to be placed on the paper.
5. Transferring: At this stage, the developed image is rotating into position and the toner is held on the EP drum with a relative negative charge. The paper is pulled into the printer and passes by the transfer corona roller, where it receives a highly positive charge on its back side. The paper then passes under the negatively charged EP drum, and the toner is transferred onto the highly charged paper.
6. Fusing: At this stage, the toner image is made permanent. The registration rollers push the papers towards the fuser rollers. Once the fuser grabs the paper and the paper passes through the fuser the fuser roller melts the resin of the toner and the rubberized pressure roller presses it permanently into the paper.
Section 1.10.5: Configuring Printers
A printer can be configured through printer properties and settings. The printer properties can be configured by following the steps given below:
1. Click Start->Settings->Control Panel->Printers and Faxes, as shown in Figure 53:

Figure 44

Figure 53
2. Right-click on the printer that you want to configure and select Printing Preferences from the menu that appears.
The Printing Preferences window of the printer appears, as shown in Figure 54. The widow allows you to set the layout of the print job and paper size.
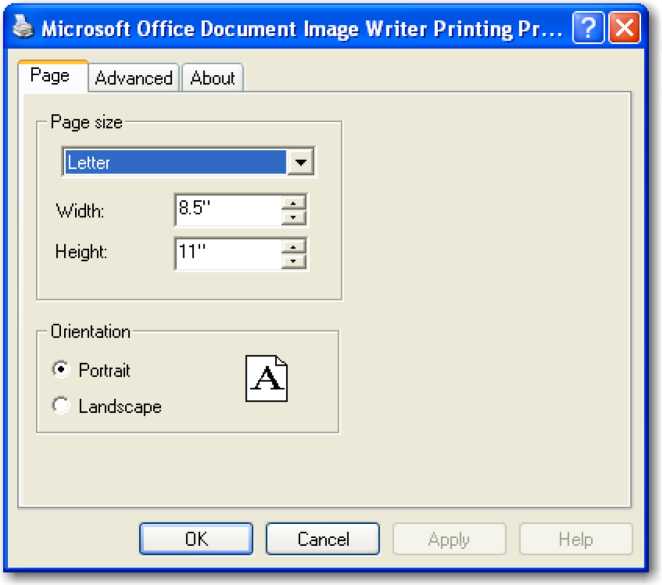
Figure 54
3. Set the desired options and click OK.
4. Right-click on the printer again and select Properties from the menu that appears.
The Properties window appears, as shown in Figure 55. This window is less about how the printer does its job and more about how people can access the printer. It shows option for sharing the printer, setting up the port for the printer, and configuring the use of the color. The Advanced tab allows you to configure the number of hours you want the printer to be available to the network users. This allows you to restrict the users from printing after the office hours.

Figure 55
The Advanced tab also allows you to set the priority of the print job, as shown in Figure 56. The higher priority jobs are always printed before the low priority jobs. You can also configure the spool settings from this tab. It is always better to spool the print jobs rather than printing them directly through the printer. The spooler may however, sometimes can cause problems and print garbage. In that case, the print jobs may be directly sent to the printer.

Figure 56